Making a robotic hand can be a challenging but rewarding science project. Here is a step-by-step guide to help you get started:
Materials:
- Arduino board
- Servo motors (4 or 5, depending on the design)
- Jumper wires
- Breadboard
- 9v battery
- Resistors (220 Ohms)
- Potentiometer (10 kOhms)
- Cardboard or 3D printer for hand parts
- Glue or screws for assembly
- Power supply (battery or AC adapter)
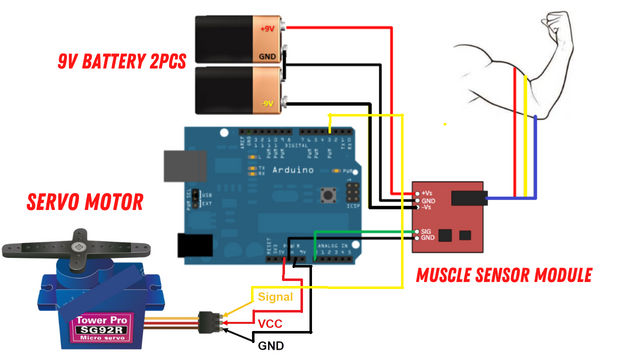
- Muscle Sensor module

Instructions:
- Plan the design of your robotic hand. You can make a simple 3-fingered hand or a more complex one with more fingers and joints.
- Create a template for the hand parts. You can use cardboard or 3D printing to create the parts. Here are the parts you will need for a 3-fingered hand:
- Palm (1)
- Fingers (3)
- Wires to connect the fingers to the servos
- Assemble the servo motors. Attach the servo horns to the servo motors and connect them to the jumper wires. You can use standard size servos, like the SG90, or larger ones, like the MG996R.
- Connect the servo motors to the breadboard. Use the jumper wires to connect the servo motors to the breadboard. You will need to connect the power and ground pins of the servos to the breadboard, as well as the signal pins to the Arduino.
- Connect the potentiometer to the breadboard. Use jumper wires to connect the potentiometer to the breadboard. The potentiometer will be used to control the movement of the fingers.
- Connect the Arduino board to the breadboard. Use jumper wires to connect the Arduino board to the breadboard. Make sure that the connections are correct. You can connect the servo signal pins to digital pins 9-13 of the Arduino.
- Write the code. Use the Arduino IDE to write the code for your robotic hand. The code should control the movement of the servo motors and read the input from the potentiometer. Here is a sample code for a 3-fingered hand:
Please see the video:video
#include <Servo.h>
Servo thumb;
Servo index;
Servo middle;
int potPin = A0;
void setup() {
thumb.attach(9);
index.attach(10);
middle.attach(11);
pinMode(potPin, INPUT);
}
void loop() {
int potValue = analogRead(potPin);
int thumbPos = map(potValue, 0, 1023, 0, 180);
int indexPos = map(potValue, 0, 1023, 0, 90);
int middlePos = map(potValue, 0, 1023, 0, 90);
thumb.write(thumbPos);
index.write(indexPos);
middle.write(middlePos);
delay(15);
}
Arduino Gps Project: Click Here
This code reads the input from the potentiometer and maps it to the positions of the servo motors. The thumb servo is controlled by the full range of the potentiometer, while the index and middle servos are controlled by half of it.
- Upload the code to the Arduino board. Once you have written the code, upload it to the Arduino board.
- Test the robotic hand. Turn on the power supply and test the movement of the fingers. Adjust the code as needed to improve the performance.
- Assemble the hand parts. Attach the hand parts to the servo motors using glue or screws.
- Test the robotic hand again. Make sure that the hand parts move correctly and that the hand can grasp and release objects.
I hope this helps you build your own robotic hand!
Here is Youtube Video Code:Click Here

