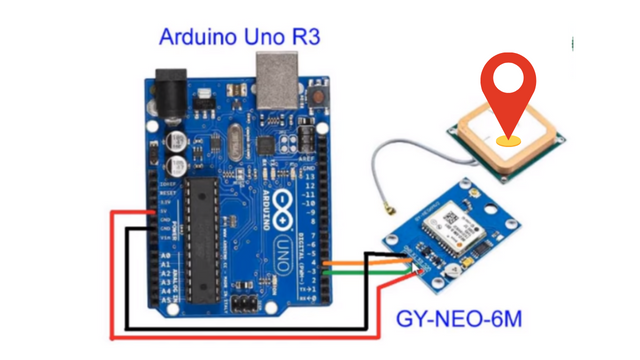
The Neo-6M GPS module is a popular GPS module that can be used to track location. You can interface it with a microcontroller like Arduino and write a program to track and store the GPS data. The GPS module provides data in NMEA format, which you can parse to extract relevant information such as latitude, longitude, altitude, speed, etc. This information can then be displayed on an OLED display, logged to an SD card, or sent to a computer over serial communication for GPS location tracker by using NEO6M.
The Neo-6M GPS module is a compact, high-precision GPS module that is widely used in various GPS tracking applications. It supports a wide range of navigation and location-based services, including real-time positioning, tracking, and navigation.
Here are some of the key features and specifications of the Neo-6M GPS module:
- GPS receiver: 50 channel all-in-view tracking
- Position accuracy: <2.5m CEP
- Update rate: up to 10Hz
- Operating voltage: 3.3V to 5V
- Communication interface: serial (UART)
- Operating temperature: -40°C to 85°C
In order to use the Neo-6M GPS module, you need to connect it to a microcontroller (such as an Arduino) and write a program to extract and process the GPS data. The GPS module outputs data in NMEA format, which can be parsed to extract relevant information such as latitude, longitude, altitude, speed, etc.
You can also interface the Neo-6M GPS module with other electronics such as OLED displays, SD cards, or computers, to visualize and log the GPS data. With the right programming, you can create a GPS tracker that can be used for a variety of location-based applications, such as real-time vehicle tracking, outdoor adventures, or personal navigation.

o interface the Neo-6M GPS module with an Arduino board, you can follow these steps:
- Connect the Neo-6M GPS module to the Arduino board: Connect the RX pin of the GPS module to the TX pin of the Arduino board and connect the TX pin of the GPS module to the RX pin of the Arduino board. Additionally, connect the VCC and GND pins of the GPS module to the 5V and GND pins of the Arduino board, respectively.
- Install the TinyGPS library: The TinyGPS library is a useful tool that simplifies the process of parsing the NMEA data that the GPS module outputs. You can install it through the Arduino IDE by going to Sketch > Include Library > Manage Libraries, and searching for “TinyGPS.”
- Write the code: Use the Arduino IDE to write a program that reads the data from the GPS module and extracts the relevant information. You can use the TinyGPS library functions to parse the NMEA data and extract the latitude, longitude, speed, etc. You can then display the extracted data on the Serial Monitor or an OLED display.
Here’s an example of a simple code that uses the TinyGPS library to extract the latitude and longitude from the GPS module and display it on the Serial Monitor:
#include <SoftwareSerial.h>
#include <TinyGPS++.h>
SoftwareSerial ss(10, 11); // RX, TX
TinyGPSPlus gps;
void setup() {
Serial.begin(9600);
ss.begin(9600);
}
void loop() {
while (ss.available() > 0) {
if (gps.encode(ss.read())) {
if (gps.location.isValid()) {
Serial.print(“Latitude: “);
Serial.print(gps.location.lat(), 6);
Serial.print(” Longitude: “);
Serial.println(gps.location.lng(), 6);
}
}
}
}
Note: Make sure to adjust the RX and TX pins according to your connections. Also, the baud rate of the Neo-6M GPS module is 9600 by default, so make sure to set the baud rate in the code accordingly.
ভিডিওটিতে যে কোডিং দেখিয়েছি আপনি এইখান থেকে সেই কোডিং টা নিতে পারেন: কোডিং
ভিডিওটা না দেখে থাকলে ভিডিওটা এখান থেকে দেখতে পারেন: VIDEO
